Hands-on Project 11-3 : Using TrueCrypt
About TrueCrypt
Free open-source disk encryption software for Windows 7/Vista/XP, Mac OS X, and Linux
Main Features:
- Creates a virtual encrypted disk within a file and mounts it as a real disk.
- Encrypts an entire partition or storage device such as USB flash drive or hard drive.
- Encrypts a partition or drive where Windows is installed (pre-boot authentication).
- Encryption is automatic, real-time (on-the-fly) and transparent.
- Parallelization and pipelining allow data to be read and written as fast as if the drive was not encrypted.
- Encryption can be hardware-accelerated on modern processors.
- Provides plausible deniability, in case an adversary forces you to reveal the password:
- Hidden volume (steganography) and hidden operating system.

First, I go to http://www.truecrypt.org/ to get TrueCrypt.

Screen shot of the Download page.
TrueCrypt is not for Windows only, it is also available on other Operating System.

Here's the setup file I downloaded.

I proceed on to install TrueCrypt.

After installation, I click on the shortcut on desktop to start TrueCrypt.
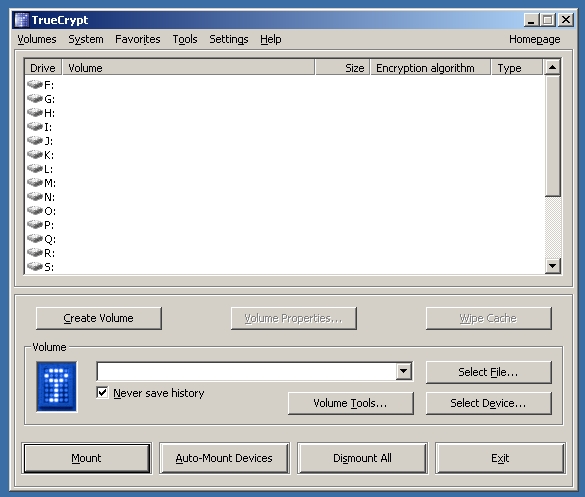
This is the screen of TrueCrypt.
I click on Create volume button to start creating a new container.
Next 7 picture will show the process of creating volume:
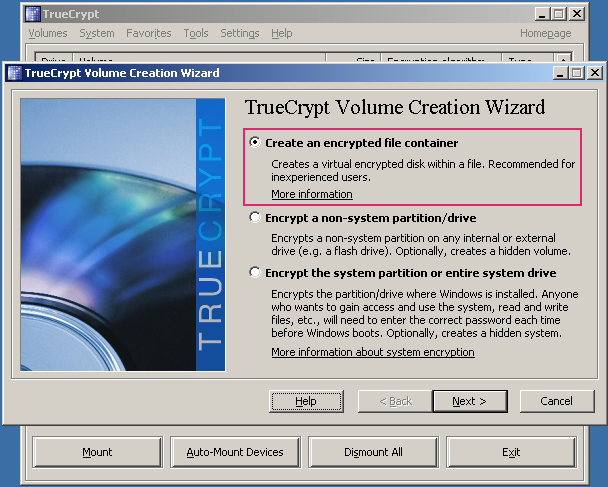


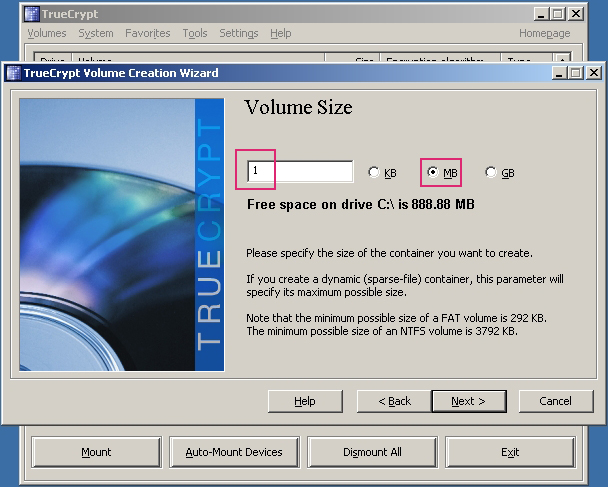


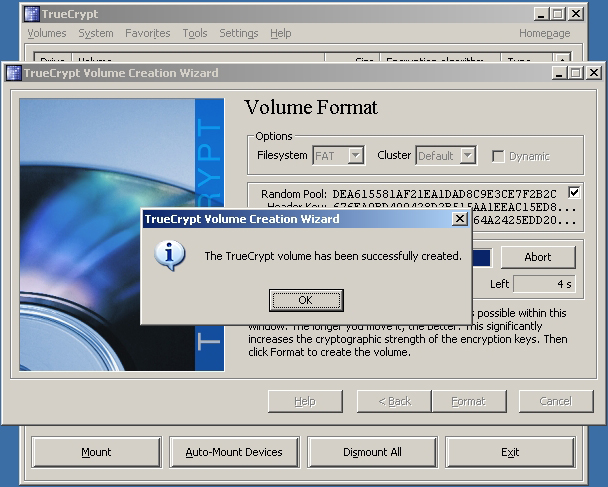
Now I have successfully created a new container.

After creating the TrueCrypt Encrypted volume container, I mount this container as a volume.

The volume now appear as mounted.

I go on to save the "Encryoted.txt" (I created this file for Hands-on Project 11-2) as "TrueCrypt Encrypted.txt" in the TrueCrypt container.

By opening the TrueCrypt container, I can see my txt file there.
After this, I clicked on Dismount to stop my container and exit everything.
Reflection:
This practical allows me to try out another type of encryption software. I used the Microsoft's Encrypting File System in the last practical (11-2), now that I tried this TrueCrypt, I feel that TrueCrypt is much more convenient. It can be installed on Windows 7/Vista/XP, Mac OS X, and Linux, and supports all version of OS. This is really useful to users, like me, who is using a Windows Vista OS that do not support EFS. However, the drawback about this software is that, we need to download and install it, as compare to EFS which is built-in, TrueCrypt requires a longer step for installation and configuration before we can start encrypting files with it.
Another thing that I find better in TrueCrypt is that it actually encrypts a partition or drive where Windows is installed when EFS is only a filesystem-level encryption. TrueCrypt definitely has more and better functions than EFS.Labels: Hands-on Project, Practical08
林小颍's work ^—^V
Hands-on Project 11-2
Date:
Hands-on Project 11-2 : Using Microsoft's Encrypting File System (EFS)
About Microsoft's Encrypting File System (EFS)
The Encrypting File System (EFS) on Microsoft Windows is a file system filter that provides filesystem-level encryption and was introduced in version 3.0 of NTFS[1]. The technology enables files to be transparently encrypted to protect confidential data from attackers with physical access to the computer.
Operation
EFS works by encrypting a file with a bulk symmetric key, also known as the File Encryption Key, or FEK. It uses a symmetric encryption algorithm because it takes a smaller amount of time to encrypt and decrypt large amounts of data than if an asymmetric key cipher is used. The symmetric encryption algorithm used will vary depending on the version and configuration of the operating system; see Algorithms used by operating system version below. The FEK (the symmetric key that is used to encrypt the file) is then encrypted with a public key that is associated with the user who encrypted the file, and this encrypted FEK is stored in the $EFS alternate data stream of the encrypted file.[citation needed] To decrypt the file, the EFS component driver uses the private key that matches the EFS digital certificate (used to encrypt the file) to decrypt the symmetric key that is stored in the $EFS stream. The EFS component driver then uses the symmetric key to decrypt the file. Because the encryption & decryption operations are performed at a layer below NTFS, it is transparent to the user and all their applications.
Folders whose contents are to be encrypted by the file system are marked with an encryption attribute. The EFS component driver treats this encryption attribute in a way that is analogous to the inheritance of file permissions in NTFS: if a folder is marked for encryption, then by default all files and subfolders that are created under the folder are also encrypted. When encrypted files are moved within an NTFS volume, the files remain encrypted. However, there are a number of occasions in which the file could be decrypted without the user explicitly asking Windows to do so.
Files and folders are decrypted before being copied to a volume formatted with another file system, like FAT32. Finally, when encrypted files are copied over the network using the SMB/CIFS protocol, the files are decrypted before they are sent over the network.
The most significant way of preventing the decryption-on-copy is using backup applications that are aware of the "Raw" APIs. Backup applications that have implemented these Raw APIs will simply copy the encrypted file stream and the $EFS alternate data stream as a single file. In other words, the files are "copied" (e.g. into the backup file) in encrypted form, and are not decrypted during backup.
Starting with Windows Vista, a user's private key can be stored on a smart card; Data Recovery Agent (DRA) keys can also be stored on a smart card.

Source:Wikipedia
I encountered a problem while trying to do this practical.
While half way through this practical, I realise I couldn't check the "Encrypt Contents to secure data” box.
;
So I did a search on web. And here's what I understand from the web.
But first of all, just let you know, I'm running Windows Vista Home Premium.
And according to the web,
Vista Home basic and premium do not deliver the capability to encrypt but just to decrypt folders and files.
Encrypting File System Supported operating systems
Windows
- Windows 2000 Professional, Server, Advanced Server and Datacenter editions
- Windows XP Professional, also in Tablet PC Edition, Media Center Edition and x64 Edition
- Windows Server 2003 and Windows Server 2003 R2, in both x86 and x64 editions
- Windows Vista Business, Enterprise and Ultimate editions[6]
- Windows 7 Professional, Enterprise and Ultimate editions
- Windows Server 2008 and Windows Server 2008 R2
- Source: Wikipedia
So I did this practical in VMware instead, Windows 2003 servers.
To begin, I create a txt document with some content.
And I save it as "Encrypted.txt". I go on to create another document and save it as "Not Encrypted.txt".
(I'm suppose to create word document, but unfortunately, I didn't install Microsoft Office on my VMware, so I use text file as a replacement.)

The 2 text files I created.

I save the files on desktop, so I go to desktop and select "Encrypted.txt",
right click > Properties > Advanced.

Since I'm using Windows 2003 Server which supports Encrypting File System, I'm able to check the "Encrypt Contents to secure data” box.
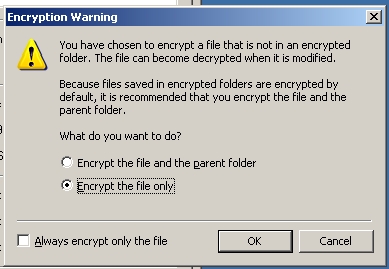
There's a warning message, i select to encrypt the file only and clicked OK.
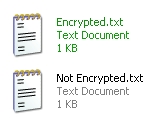
The encrpted file turns green after the above steps.
Reflection:
This practical allow me to turn on and use Mircrosoft's Encrypting File System (EFS). If not that I happen to be running Windows Vista Home Premium, I would not know that not all versions of Windows OS supports EFS. Besides that I also learnt that encrypted files or folder will appear in green in Windows Explorer and although unauthorized users will be able to view the list of files in an encrypted folder, any attempt to open one will be met by an Access Denied message. This is also something that the textbook did not mention.Labels: Hands-on Project, Practical08
林小颍's work ^—^V
Hands-on Project 11-1
Date:
Hands-on Project 11-1 : Installing Hash Generators and Comparing Hashes.

To begin with this practical, I go to http://md5deep.sourceforge.net/ to get md5deep.

This is the download page. I clicked on Windows Binary and downloaded the lastest version of the program.

I get the md5deep-3.6.zip file. After I unzip it, this is what I see.

Next, I go on to create a word document, which will be used to test hash algorithms.

I opened command prompt.
For the 3rd line, I navigated to the folder that contains the downloaded files.
4th line, an MD5 hash of Country1.docx is created
5th line, an MD5 hash of MD5DEEP.txt is created
6th line, an MD5 hash of Country2.docx is created

1st line, an MD5 hash of sha1deep.exe is created
2nd line, an MD5 hash of sha256deep.exe is created
3rd line, an MD5 hash of whirlpooldeep.exe is created
Reflection:
Qns: What is the length of the hash generated for country.doc and MD5DEEP.txt?
Ans: The length of the hash generated for the two documents is the same.
Qns: Looking at the hash, can you find any letters ranging from letter 'g' to 'z'? Why? What number system is the hash represented?
Ans: I can't find any letters ranging from letter 'g' to 'z'. This is becuase the hash represented Hexadecimal number system which is only up to letter "f".
Qns:What is the length of the hashes in terms of bits?
Ans: 1 character = 1 byte = 8 bits
16 characters × 8 bits = 128 bits
From this hands-on project, I learnt that hashes have same length, a hash of a short set of data will produce the same length as a hash of a long set of data. This is shown by comparing the hashes for Country1.docx and MD5DEEP.txt. Secondly, two different sets of data cannot produce the same hash. Just like the example I did for this practical, "Now is the time for all good men to come to the aid of their country." and "Now is the time for all good men to come to the aid of their country" produce two different hash, although there is only a slight difference with the two sets of data, ".".Labels: Hands-on Project, Practical08
林小颍's work ^—^V
Hands-on Project 8-5
Date:
Hands-on Project 8-5 : Use an OpenID Account

Screenshot of http://www.livejournal.com/openid/
I entered my identity URL(which is yojaeon.pip.verisignlabs.com) in "Your OpenID URL"

After I clicked login, i returned to the Personal Identity Provider OpenID site of Verisign Labs.
(As I did not log out, I do not have to enter Username and passwords again.)
And the URL bar of this page indicates that this is the Verisign site.

I allowed Livejournal to use "yojaeon" as my OpenID and I returned to Livejournal website.

Next I go to http://www.lifewiki.net/login
Same as what I did for Livejournal website, I entered my Identity URL.

Clicked on allow

And i was logged in to Lifewiki
Reflection:
From the last practical (Hands-on Project 8-4) I did, I created an OpenID. So for this practical, I am going to use the account. As you can see from the pictures above, I tested out with LiveJournal and Wikilife website. I simply enter my identity URL and when the website redirects me back to https://pip.verisignlabs.com/. I only have indicates I trusts these websites with my identity, https://pip.verisignlabs.com/ will send me back to the websites and I am then authenticated. Overall, it seemed very easy to use, all that required is my identiy URL. Only if OpenID is supported by more websites, I will recommend it to other users, right now there’s only around 240 websites (according to OpenID Directory) that uses OpenID. Not really worth to have an account.
Next, is the security issue. OpenID has its weakness, it depends on the URL identifier routing to the correct server, which depends on a domain name server (DNS) that has its own security weakness. In this current format, OpenID is not considered strong enough for most banking and e-commerce Web sites. Thus, I will not access my bank information with it. However, for less secure sites, I will still consider to use it.Labels: Hands-on Project, Practical07
林小颍's work ^—^V
Hands-on Project 8-4
Date:
Hands-on Project 8-4 : Create an OpenID Account

First, I go to https://pip.verisignlabs.com/
This is the Personal Identity Provider OpenID site of Verisign Labs.

Next, I clicked on Create account.
This is a screenshot of me filling up requested information.

Sucessfully created an account.

I go to my e-mail account to verify the OpenID account.

I changed my Personal Icon.

Go to My Account>My Information>Personal Profile
Under Personal Profile I can view or edit my information.
Reflection:
For Hands-on Project 8-4, I tried to create an OpenID account on https://pip.verisignlabs.com/, which is the Personal Identity Provider OpenID site of Verisign Labs.
OpenID is defined as a decentralized open source federated identity management system that does not require specific software to be installed on the desktop.
You can refer to the steps above with screenshots to create an OpenID account. Overall, it is very simple. I did not encounter any problem while creating the account. There’s no restriction on what information I must enter, I can also personalize the profile picture, it is very easy to use.Labels: Hands-on Project, Practical07
林小颍's work ^—^V
Hands-on Project 8-1
Date:
Hands-on Project 8-1 : Use Cognitive Biometrics
About Cognitive biometrics
Cognitive biometrics is related to the perception, thought process, and understanding of the user. It is considered to be much easier for the user to remember because it is based on the user’s life experiences. This also makes it very difficult for an attacker to imitate.
- One example of cognitive biometrics is based on a life experience that the user remembers.
- Another example of cognitive biometrics requires the user to identify specific faces.

For this hands-on project, I am going to participate in a demostration of Passfaces.
First, I go to http://www.passfaces.com/demo/.
Under "First Time Users", I entered the requested information.
About Passfaces
Passfaces is a unique strong authentication technology that works with existing security systems to supplement or replace the use of passwords for system access. Passfaces uses human faces rather than alphanumeric entries to validate a user's identity. This patented technology is only available from Passfaces.

After I click to enroll, it shows a Thank You page.

Together with the Thank You page, there is also a pop up screen like this.

This is the demo process. I screenshot the whole steps and make it into a gif.


The introduction to Passface. This screen shows the steps I'm going to do.


Step by step guide.
The STEP 2 allows me to further remember the 3 faces I'm given.
Step 3 tested if I can recall those faces.


Lastly, I passed the log on test and managed to log on.
Reflection:
There are a few examples of Cognitive Biometric. This practical introduces Passfaces which uses human faces rather than alphanumeric entries to validate a user's identity. I think this type of Cognitive Biometric is quite effective, at least to me, I prefer this to a password. It is easily recognized, difficult to describe, share, and most importantly, impossible to guess. I tried to look at the screenshot with 9 faces again a day after I did this hands-on project, I’m still able to recognize the faces. This shows that my brain actually works better with graphics, like photos. Thus, I think this Passface technology might be able to replace the current alphanumeric passwords in the later years.Labels: Hands-on Project, Practical07
林小颍's work ^—^V